Creating Printable PDF Academic Calendar


How to Create a Printable PDF Academic Calendar (Updated Guide)
Want a flexible and easy way to design and print academic calendars? Here’s a step-by-step walkthrough using timeanddate.com, where you can customize your layout, include national holidays, and even add your own events. Let’s get to it!
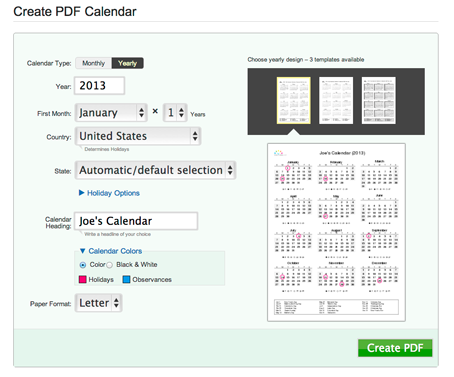
1. Set Up the Calendar Basics
- Visit timeanddate.com’s calendar creation tool.
- Pick your calendar type:
- Monthly - 12 separate pages, one for each month.
- Yearly - All months on a single page (you can generate up to 3 years at once, starting from the same month).
- Choose a design template by clicking one of the options in the preview area.
- Select the year and your starting month (useful when building multi-month or multi-year layouts).
- Specify the number of months (up to 36) or years (up to 3 consistent year calendars).
- Pick your country and state/region (if available) to include local holidays.
- In the Holiday Options dropdown, customize what shows up:
- Select categories of holidays (national, observances, etc.).
- Choose religious holidays separately if you like.
- Provide a title or heading for your calendar.
- Use the Calendar Colors dropdown to style holiday highlights.
- Set your paper size (A4, Letter, or Legal).
- If you prepared custom events (steps below), check the “Add events” box.
- Hit Create PDF-your calendar will download automatically. Save it or print directly!
2. Add Your Own Events (like exams, special dates)
To include personalized events, you’ll first need to build an event list:
- Go to the “My events” section on timeanddate.com.
- Select “New event list”, name it, and choose a calendar type.
- Click “Add event list”. You can create multiple lists and later edit them by selecting them from the left panel.
Adding Events:
- Click “New event” in your event list.
- Enter a title, choose the right event list, and set the date.
- Hit “Add event”.
Handling Recurring Events:
- In the “Repeat” menu, select daily/monthly/yearly, etc.
- Specify frequency (e.g. every 2nd day, monthly).
- Define an end condition: no end (Never), a number of occurrences, or a specific date.
Birthdays/Anniversaries:
- Use the “Anniversary/Birthday” checkbox to enable auto-yearly recurrence with an age count display.
- Remember: you must enter the year of birth - otherwise, the age display will be incorrect.
Applying Your Events to the Calendar:
- Click “Create PDF calendar” from the “My events” page.
- This redirects to the usual calendar setup where your event list(s) appear under the “My events” dropdown.
- Select one (or multiple lists), then click “Create PDF” to generate and download.
Summary Table
| Step | What to Do |
|---|---|
| 1. Calendar Setup | Choose layout, year, months, region, holidays, style, and size. |
| 2. Create Event List | In “My events”, create and name event lists. |
| 3. Add Events | Enter titles, dates, recurrence settings, birthdays/anniversaries. |
| 4. Build Calendar PDF | Apply event lists to your calendar, then generate and download. |
With this process, you can easily customize calendars for the academic year, add your own schedules like exam dates or school events, and print or share as needed