Building a Smart Clock with Raspberry Pi: A DIY Guide
The Raspberry Pi Smart Clock project leverages the versatility of the Raspberry Pi, an HDMI display, and web technologies (HTML, CSS, JavaScript) to create an always-on digital clock with real-time weather information


Introduction
In today's fast-paced world, having quick access to information like time and weather can be incredibly useful. This project demonstrates how to transform a simple Raspberry Pi into a sophisticated smart clock that not only displays the current time but also provides live weather updates. This DIY solution is perfect for anyone looking to add a functional and aesthetically pleasing gadget to their home or office, all while learning about embedded systems and web technologies.
Project Overview
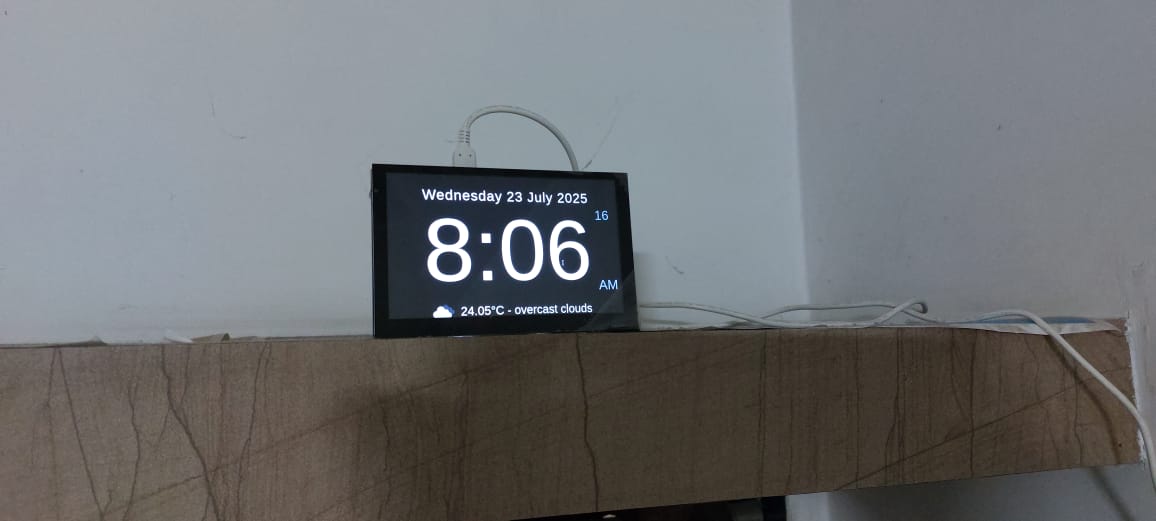
The Raspberry Pi Smart Clock project leverages the versatility of the Raspberry Pi, an HDMI display, and web technologies (HTML, CSS, JavaScript) to create an always-on digital clock with real-time weather information. The system is designed for 24/7 operation, running in a full-screen kiosk mode, making it an ideal set-and-forget device.
Key Features
- Large, Easy-to-Read Digital Clock: The display features a prominent digital clock, ensuring readability from a distance.
- Live Weather Information: Integrates with OpenWeatherMap to fetch and display current temperature and weather descriptions.
- Auto-Refresh: The time updates every second, and weather information refreshes every minute, ensuring accuracy.
- Full-Screen Kiosk Mode: Runs Chromium browser in kiosk mode for a clean, dedicated display.
- 24/7 Operation: Configured to prevent screen blanking, ensuring continuous display.
Technical Deep Dive
The core of this project lies in its simplicity and effective use of readily available technologies. The front-end is built using standard web languages:
- HTML: Structures the content, including the date, time, and weather elements.
- CSS: Styles the display for optimal readability, defining fonts, sizes, colors, and layout.
- JavaScript: Handles the dynamic aspects, such as fetching time and weather data, and updating the display in real-time.
For weather data, the project utilizes the OpenWeatherMap API. A config.json file stores the API key and desired city, allowing for easy customization without modifying the core code. The backend, if you can call it that, is a simple Python HTTP server that serves the HTML, CSS, and JavaScript files.
Autostart and Kiosk Mode
To ensure the clock starts automatically on boot and runs in full-screen, the project uses systemd services:
rpiclock.service: A systemd service that starts a Python HTTP server to serve the web interface.rpiclock-kiosk.service: Another systemd service that launches Chromium in kiosk mode, pointing it to the local HTTP server. This service is configured to start only after therpiclock.serviceis active, ensuring the web server is ready before the browser attempts to load the page.
Screen blanking is disabled to maintain continuous display, which is crucial for an always-on clock.
Getting Started: A Step-by-Step Guide
Recreating this project is straightforward, even for those new to Raspberry Pi. Here’s a summary of the steps involved:
- Clone the Repository: Obtain the project files from the GitHub repository.
- Install Chromium: Install the Chromium browser on your Raspberry Pi OS.
- Configure API Key: Edit
config.jsonwith your OpenWeatherMap API key and desired city. - Set up Autostart Services: Configure
systemdservices for the Python server and Chromium kiosk mode. - Disable Screen Blanking: Adjust display settings to prevent the screen from turning off.
For detailed instructions, refer to the project's GitHub repository.
Why Build This?
This project is more than just a clock; it's a practical demonstration of how accessible and powerful the Raspberry Pi can be for everyday applications. It's an excellent learning opportunity for:
- Beginners in IoT: Understand how to connect physical devices with online data.
- Web Developers: See web technologies applied in an embedded context.
- DIY Enthusiasts: Create a useful gadget with minimal cost and effort.
Conclusion
The Raspberry Pi Smart Clock with Weather Display is a testament to the power of open-source hardware and software. It's a fun, educational, and highly functional project that brings modern conveniences to your living space. We encourage you to explore the code, customize it to your needs, and share your own improvements.
Author: Rajendra Khope
Project Link: https://github.com/bkrajendra/rpiclock
License: MIT License